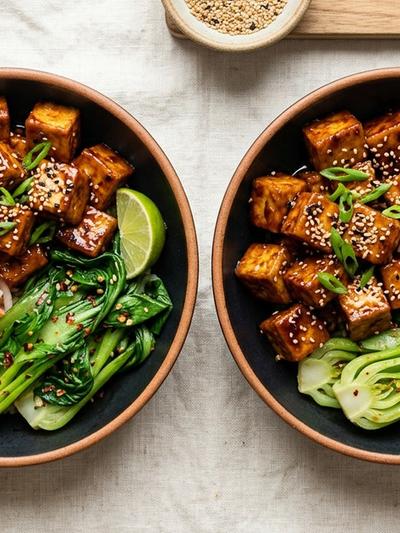
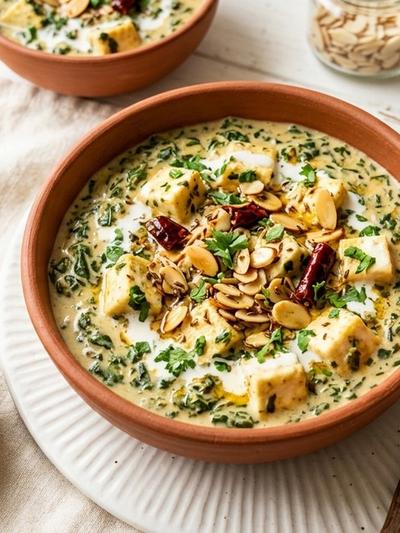
Imagine biting into a crispy-edged cube of golden paneer coated in a sticky, umami-rich sesame-ginger glaze — nutty toasted sesame, sharp fresh ginger, and a whisper of chili heat all clinging to that perfectly seared exterior. Underneath, a bed of fluffy coconut cauliflower rice soaks up every drop of sauce, while tender bok choy adds a fresh, verdant crunch. This is the kind of dinner that makes you forget you are eating keto, because every single bite tastes like takeout — only better.
Each bowl delivers 34 grams of fat and just 6 grams of net carbs, making it an ideal macro split for ketogenic eating. The paneer provides a solid 22 grams of complete protein per serving, and the coconut cream stirred into the cauliflower rice pushes the fat ratio to a satisfying 73 percent of total calories. You get that deep satiety keto is known for without a single grain of rice or noodle in sight.
Best of all, this recipe is engineered for batch cooking. The entire meal — paneer, sauce, cauliflower rice, and vegetables — comes together in about 40 minutes and stores beautifully in the fridge for up to five days. Portion it into four containers on Sunday evening and you have dinner handled through Thursday. The flavors actually deepen overnight as the glaze melds with the paneer, so day-two leftovers might be the best bowl of the bunch.
Ingredients (serves 4)
For the sesame-ginger paneer:
- 14 oz (400g) paneer, cut into 3/4-inch cubes
- 2 tablespoons (30ml) avocado oil or coconut oil
- 2 tablespoons (30ml) toasted sesame oil
- 3 tablespoons (45ml) coconut aminos
- 1 tablespoon (15ml) rice vinegar (unseasoned)
- 1 tablespoon (6g) fresh ginger, finely grated
- 3 cloves garlic, minced
- 1/2 teaspoon red pepper flakes (adjust to taste)
- 1 tablespoon (8g) toasted white sesame seeds
For the coconut cauliflower rice:
- 1 medium head cauliflower, riced (about 4 cups / 480g)
- 1/2 cup (120ml) full-fat coconut cream
- 1 tablespoon (15ml) coconut oil
- 1/2 teaspoon fine sea salt
- 1/4 teaspoon white pepper
For the stir-fried bok choy:
- 3 medium baby bok choy (about 10 oz / 280g), halved lengthwise
- 1 tablespoon (15ml) avocado oil
- 1 tablespoon (15ml) coconut aminos
- 1 teaspoon toasted sesame oil
For garnish:
- 2 scallions, thinly sliced
- 1 tablespoon (8g) toasted sesame seeds
- Chili oil or sriracha (optional)
Instructions
Prepare the glaze. In a small bowl, whisk together the coconut aminos, rice vinegar, grated ginger, minced garlic, and red pepper flakes. Set aside. This takes just two minutes and allows the ginger and garlic to start releasing their oils into the liquid.
Sear the paneer. Heat the avocado oil in a large nonstick skillet or well-seasoned cast iron pan over medium-high heat until the oil shimmers, about 2 minutes. Arrange the paneer cubes in a single layer — work in two batches if necessary to avoid crowding. Cook without moving for 2 to 3 minutes per side until deep golden brown on at least two sides. The paneer should develop a firm, lightly crispy crust while remaining soft and creamy inside. Transfer to a plate.
Build the glaze in the pan. Reduce the heat to medium. Add the toasted sesame oil to the same skillet and pour in the ginger-garlic glaze mixture. It will sizzle immediately. Stir constantly for 60 to 90 seconds until the sauce reduces slightly and becomes fragrant — you will smell the toasted sesame and sharp ginger hit the air together. Return the seared paneer to the pan and toss gently to coat every cube. Cook for another minute, turning the cubes so the glaze clings and caramelizes onto the surface. Sprinkle with 1 tablespoon of sesame seeds, toss once more, and transfer the glazed paneer to a clean bowl.
Make the coconut cauliflower rice. Wipe the skillet clean and return it to medium heat. Add the coconut oil and let it melt. Add the riced cauliflower and season with salt and white pepper. Stir-fry for 4 to 5 minutes until the cauliflower is just tender and any excess moisture has cooked off — you want it dry and fluffy, not soggy. Pour in the coconut cream and stir well, cooking for another 2 minutes until the cream is fully absorbed and the rice looks glossy and rich. Taste and adjust salt. Transfer to a large bowl.
Stir-fry the bok choy. Return the skillet to high heat and add the avocado oil. When it shimmers, lay the bok choy halves cut-side down in the pan. Sear without moving for 2 minutes until the cut sides develop golden char marks. Flip and cook for 1 minute more, then drizzle with coconut aminos and sesame oil. Toss quickly — the leaves will wilt and the stems should remain crisp-tender. Remove from heat.
Assemble the bowls. Divide the coconut cauliflower rice evenly among four meal-prep containers or serving bowls. Arrange the glazed paneer cubes on one side and the charred bok choy on the other. Scatter sliced scallions and toasted sesame seeds over the top. Drizzle with chili oil if you like extra heat.
Store for the week. Let the bowls cool to room temperature, then seal the containers and refrigerate. The bowls keep well for up to 5 days. To reheat, microwave each container for 2 to 2.5 minutes, or warm the contents in a skillet over medium heat for 3 to 4 minutes with a splash of water to loosen the glaze.
Nutrition per Serving
| Nutrient | Amount |
|---|---|
| Calories | ~418 kcal |
| Fat | ~34g |
| Protein | ~22g |
| Total Carbs | ~9g |
| Fiber | ~3g |
| Net Carbs | ~6g |
Nutrition is approximate and based on the stated ingredients and a 4-serving yield. Values may vary by brand of paneer and coconut cream used.
Tips & Variations
Get the crispiest paneer. Pat your paneer cubes thoroughly dry with paper towels before they hit the pan — surface moisture is the enemy of a good sear. If your paneer is very soft and fresh, freeze the cubes for 15 minutes first to firm them up. The goal is a golden, almost crackling exterior that holds the glaze without turning rubbery.
Swap the bok choy for other low-carb greens. Broccolini, Chinese broccoli (gai lan), or shredded Napa cabbage all work beautifully here. Keep the cooking time short — you want tender-crisp texture, not mush. Avoid starchy vegetables like water chestnuts or baby corn, which would spike the carb count significantly.
Watch for hidden carbs in store-bought sauces. Coconut aminos typically contain 1 gram of carbs per teaspoon, which is already factored into this recipe's macros. However, some brands add cane sugar or maple syrup. Check the label and choose a brand with zero added sugars. If you prefer tamari or soy sauce (not gluten-free), the carb count drops slightly but sodium rises.
Double the glaze for richer meal-prep bowls. When reheating batch-prepped meals, the sauce can dry out. Making a double batch of the sesame-ginger glaze and storing it separately in a small jar lets you refresh each bowl with a drizzle before reheating. The extra glaze keeps in the fridge for up to a week and adds negligible carbs.
Add a fat boost if your macros need it. For those targeting higher fat percentages — say 80 percent of calories from fat — stir an extra tablespoon of MCT oil or melted coconut oil into the cauliflower rice before portioning. You can also top each bowl with a few slices of avocado at serving time, which adds healthy fats, potassium, and fiber without meaningfully increasing net carbs.